Firecat
Firecat is a penetration testing tool that allows you to punch reverse TCP tunnels out of a compromised network. After a tunnel is established, you can connect from an external host to any port on any system inside the compromised network, even if the network is behind a NAT gateway and/or strict firewall. This can be useful for a number of purposes, including gaining Remote Desktop access to the internal network NAT’d IP address (e.g. 192.168.1.10) of a compromised web server.

Firecat Utility
Downloads
Firecat is written in C and has been tested on Linux, Solaris, iOS, Mac OS X, and Windows XP/Vista/2k/2k3/2k8.
- To compile on Windows using MinGW:
- gcc –o firecat.exe firecat.c –lwsock32
- To compile on Unix:
- gcc –o firecat firecat.c
How does it work?
Flashback a decade or so and you will recall that it was common to find hosts that were not firewalled properly (or at all) from the Internet. You could compromise a host, bind shellcode to a port, and use netcat or some other tool to take interactive command-line control of the target.
These days things are different. It is often the case that TCP/IP packets destined for a host are strictly filtered by ingress firewall rules. Often matters are further complicated by the fact that the target host is located behind a NAT gateway:
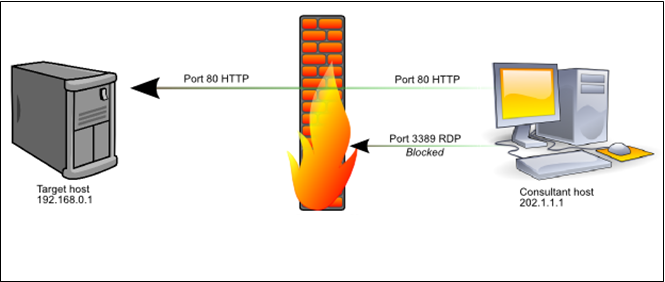
Tight firewall rules reduce the attack surface of the target environment, but attacks such as SQL injection still make it possible to execute arbitrary code on even the most strictly firewalled servers. However, unless the consultant can also take control of the firewall and alter the ruleset, it is impossible to connect directly to internal network services other than those allowed by the firewall.
That’s where Firecat comes in to play. Assuming you can execute commands on a host in a DMZ and further assuming that the host can initiate outbound TCP/IP connections to the consultant’s computer, Firecat makes it possible for the consultant to connect to any port on the target host, and often any port on any host inside the DMZ. It does this by creating a reverse TCP tunnel through the firewall and using the tunnel to broker arbitrary TCP connections between the consultant and hosts in the target environment. In addition to creating arbitrary TCP/IP tunnels into DMZ networks, it can also be used to pop connect-back shells from compromised DMZ hosts such as web or SQL servers.
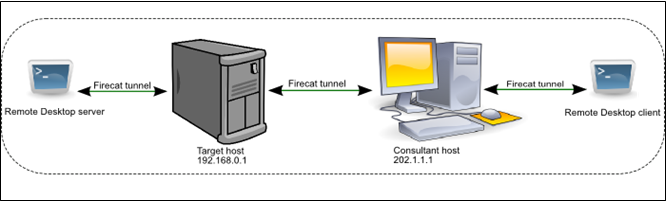
It works because the target system is the one that initiates the TCP connection back to the consultant, not the other way around. Firecat runs in “target” mode on the target, and “consultant” mode on the consultant’s system, effectively creating a tunnel between the two endpoints. Once the tunnel is established, the consultant connects to their local Firecat daemon which instructs the remote Firecat daemon to initiate a connection to the desired host/port behind the firewall. The two Firecat daemons then tunnel the data between the consultant and the target to create a seamless, transparent bridge between the two systems; thus completely bypassing the firewall rules. Firecat even works on hosts behind NAT firewalls.
Broken down into logical steps, and using the IP addresses in the diagrams, the process works as follows:
- Firecat (consultant) listens on 202.1.1.1:4444
- Firecat (target) connects to 202.1.1.1:4444
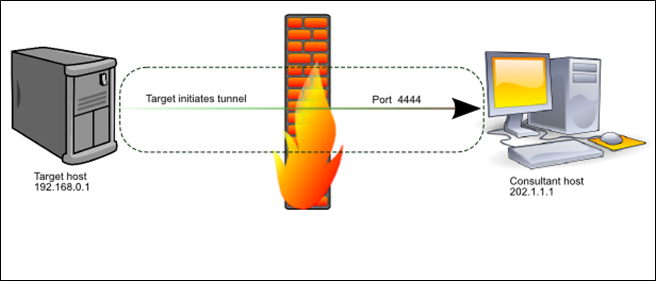
A tunnel is established between the two hosts. - A tunnel is established between the two hosts
- Firecat (consultant) listens on 202.1.1.1:3389
- Consultant connects a remote desktop client to 202.1.1.1:3389
- Firecat (consultant) tells Firecat (target) that a new session has been started
- Firecat (target) connects to 192.168.0.1:3389
- Firecat (target) tells Firecat (consultant) that it’s now connected locally
- Both Firecat instances begin to tunnel data between the consultant’s remote desktop client and the target’s remote desktop server, making it appear to the remote desktop client that it is directly connected to the target.
Example Usage
Let’s say we want to carry out the tunneling procedure as described in the above diagrams, and connect to the remote desktop service (TCP port 3389) of our target host, an IIS web server. The firewall allows only port 80/TCP to pass from the internet to the target server. The target server has an internal IP address of 192.168.0.1, NAT’d by the firewall. The target is allowed by the firewall to make outbound connections to port 443/TCP on the internet. Our system (202.1.1.1) isn’t firewalled and is directly connected to the internet.
First, we start a Firecat daemon on our own system. The “-m 0” flag tells Firecat that we’re running in consultant mode. The “-t 443” flag tells Firecat to listen on port 33 for connections from the compromised target. The “-s 3389” flag tells Firecat to listen on port 3389 for a connection from the consultant; we’ll come to that in a minute. The command line looks like this:

We now start a Firecat daemon on the remote system. The -“m 1” flag tells Firecat we’re in target mode, the “-h 202.1.1.1” specifies the IP address of our computer, and “-s 3389” specifies that we’ll be using this tunnel to connect to port 3389 of the compromised web server:

Firecat connects from the target to port 443 of our computer. Our Firecat instance notifies us of the incoming connection (the incoming IP address will be that of the target network’s NAT firewall, not the compromised host itself) and Firecat reports that the tunnel has been initialized successfully:

At this point, both Firecat instances go to sleep until we start a remote desktop client and connect to localhost:3389. When that happens, the local Firecat informs the remote Firecat, which in turn initiates a connection to the target on port 3389. Data sent from the RDP server is relayed via the Firecat tunnel back to our RDP client, and vice versa. That’s it: we have established a tunnel that allows us to initiate an RDP session with the compromised host behind the NAT firewall. Our local Firecat instance displays the good news:

The target end displays:

The tunnel is established and the two endpoints communicate transparently via Firecat until either the session is closed by the RDP client or server, or one of the Firecat instances is killed.